Mastering Component Placement on Your Audio Rack: A Guide to Sonic Harmony (2026)
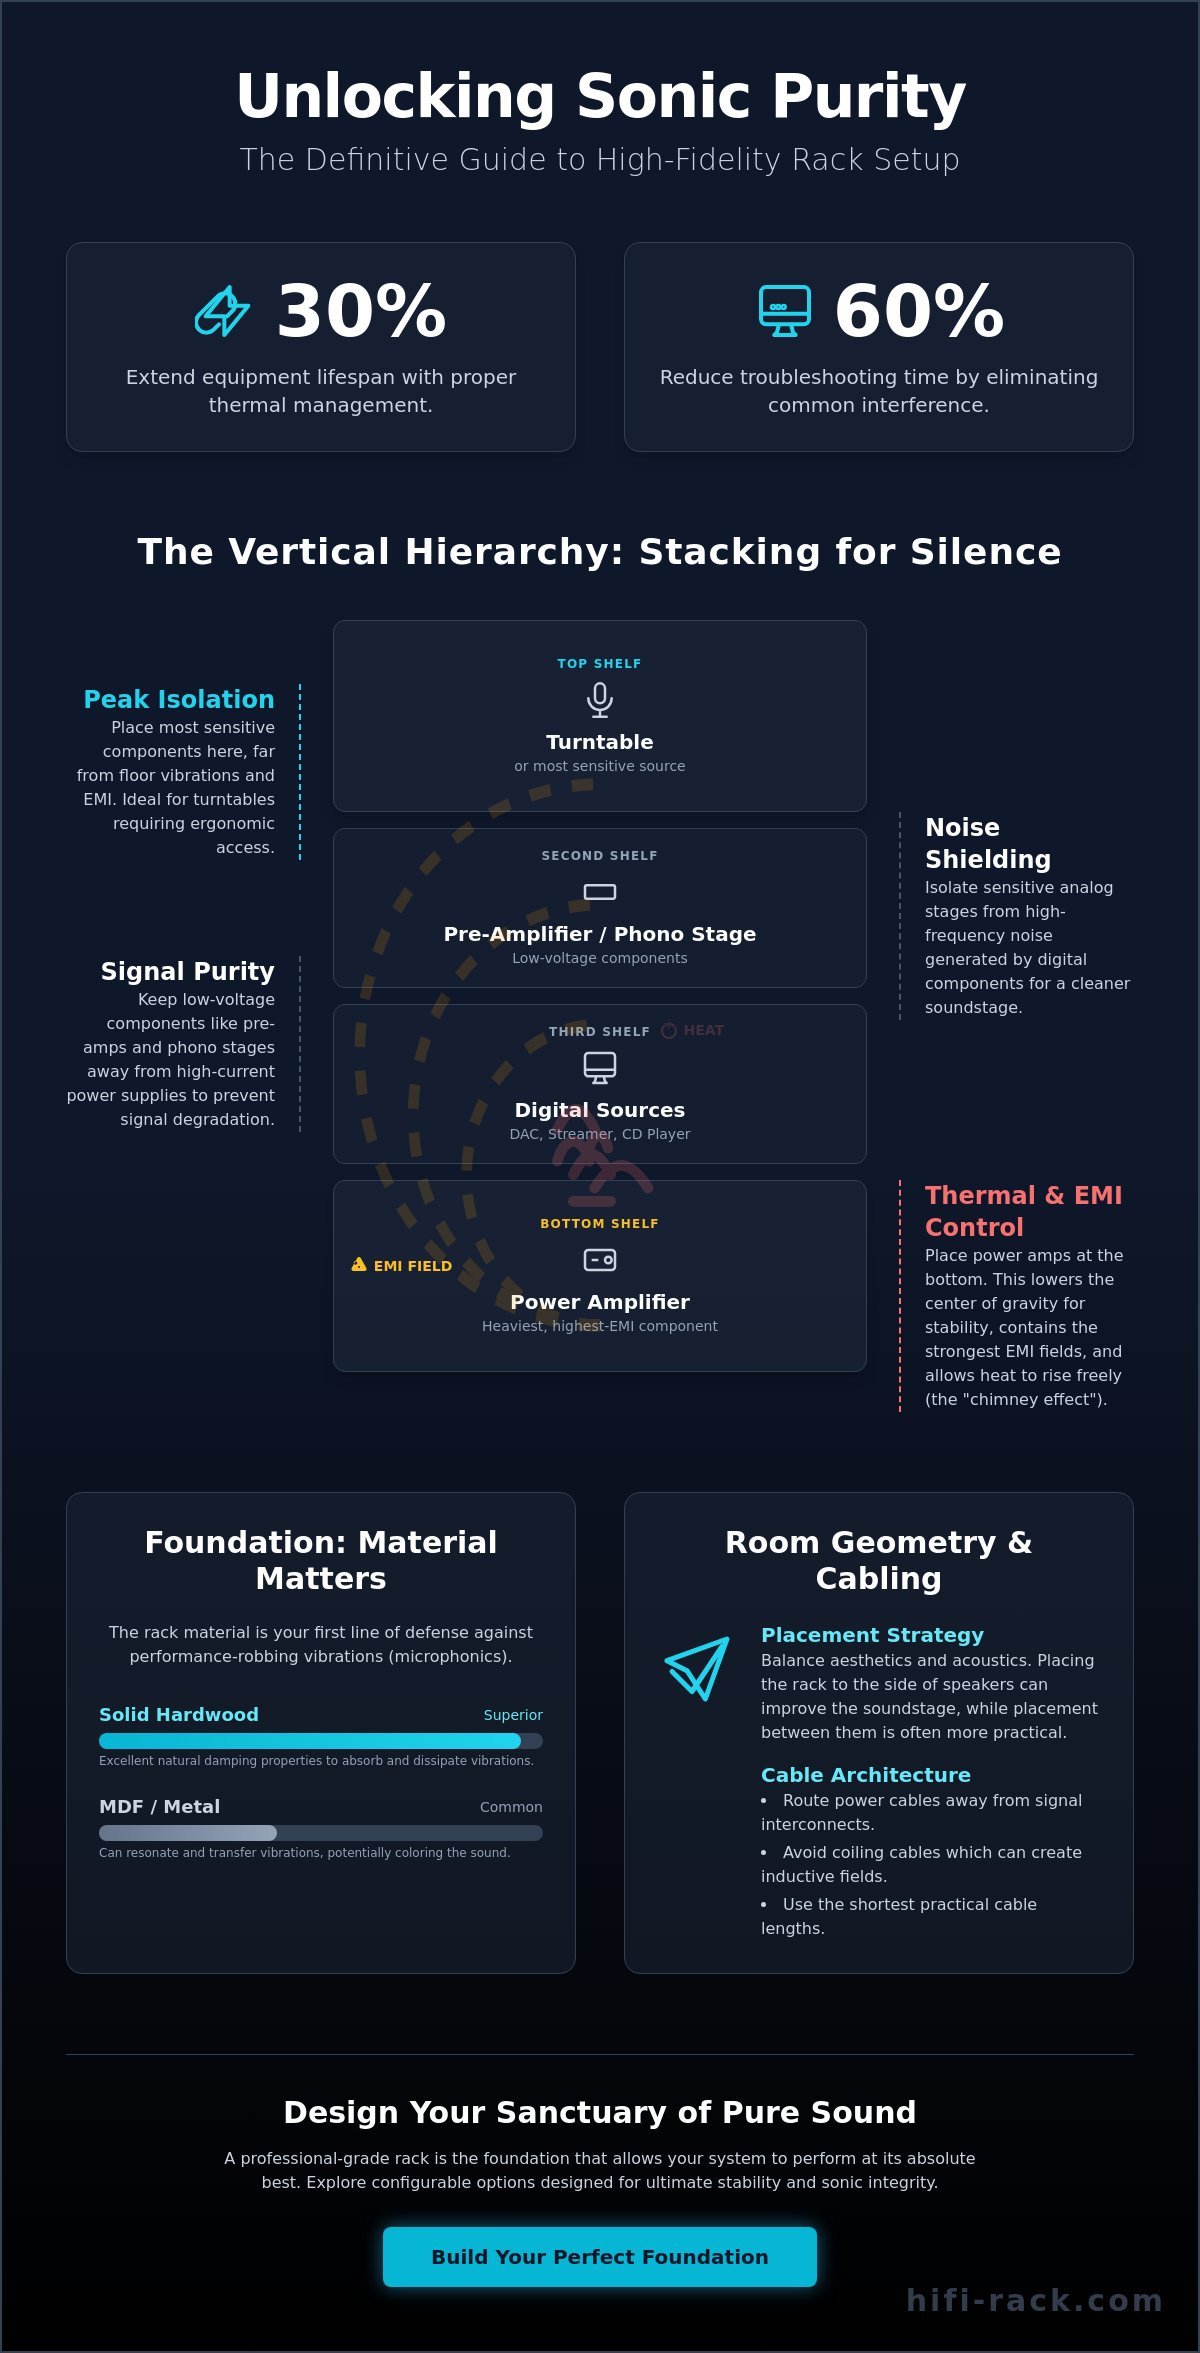
Did you know that proper thermal management alone can extend the lifespan of your high-end audio electronics by up to 30%? When you consider the deep investment sitting in your listening room, the nuances of component placement on audio rack setups become more than just an aesthetic choice; they are a fundamental requirement for sonic integrity. You've likely felt the frustration when a delicate turntable passage is marred by a mysterious hum, or when a power amplifier runs alarmingly hot to the touch. It's a common struggle to balance the raw power of these machines with the silence required for a truly immersive experience.
I believe your equipment deserves a foundation that honors its craftsmanship. This guide provides the definitive hierarchy for arranging your components to eliminate interference, manage heat, and finally unlock the full potential of your system. We'll explore how to distribute weight for stability, separate signal paths to avoid degradation, and use the natural resonance-damping properties of your rack to create a noise-free sanctuary. You'll discover how a deliberate three-dimensional strategy can reduce troubleshooting time by 60% and transform your collection into a harmonious, professional-looking sanctuary.
Key Takeaways
Master the vertical hierarchy that keeps sensitive source signals isolated from the heavy electromagnetic fields of power amplifiers.
Optimize your component placement on audio rack systems to utilize the "chimney effect," ensuring critical heat management for your high-end electronics.
Evaluate the delicate balance between room aesthetics and acoustic purity to prevent your rack from disrupting the soundstage between your speakers.
Gain a deeper understanding of how solid hardwood foundations provide superior vibration damping compared to common materials like MDF or metal.
Table of Contents
The Vertical Hierarchy: Ordering Your Stack from Top to Bottom
The Foundation: Why Solid Wood Completes Your Placement Strategy
The Physics of Placement: Why Your Component Order Matters
Every decision you make when arranging your gear alters the delicate dialogue between electricity and air. The concept of the system noise floor is often misunderstood as a purely electronic phenomenon. In reality, it's a physical baseline influenced by every vibration and magnetic field in the room. Strategic component placement on audio rack systems acts as the first line of defense against the "ghosts" in the machine. A well-designed arrangement can reduce troubleshooting time by as much as 60% by eliminating common interference issues before they start.
To better understand how physical mounting impacts the integrity of your setup, watch this helpful demonstration:
Change video
Resonance and Vibration Damping
Microphonics occur when mechanical vibrations are picked up by internal components and converted into unwanted electrical signals. It's a subtle degradation that robs music of its life and texture. High-mass components require a foundation that can anchor them, effectively draining energy away from sensitive signal paths. Acoustic isolation is the separation of a component from both floor-borne and air-borne vibrations. By using materials with natural damping properties, you ensure that the only movement in your room is the air pushed by your speakers. A stable, level surface is crucial for sensitive electronics to perform at their best.
Electromagnetic Interference (EMI)
Power transformers are the "noisy neighbors" of the high-fidelity world. They generate invisible electromagnetic fields that can easily permeate the thin chassis of a nearby pre-amplifier or phono stage. This proximity often results in a dreaded hum or a muddy, congested soundstage. Maintaining physical distance between high-current power amplifiers and low-voltage sources preserves the purity of the original recording. To manage these fields effectively, consider these spatial rules:
Keep phono stages at the maximum possible distance from large power transformers.
Route power cables away from signal interconnects to prevent inductive crosstalk.
Position digital sources on isolated tiers to shield sensitive analog stages from high-frequency noise.
The relationship between component weight and the structural frequency of the rack is vital. Placing heavier components on lower shelves increases stability and lowers the center of gravity. This mechanical grounding ensures the rack remains inert and unresponsive to the energy of the music. While standardized rack units (U) provide a framework for fit, the soul of the system lies in how you utilize that space. Many enthusiasts believe "set and forget" is the standard. In high-performance audio, refinement is a continuous pursuit. A professional-grade solution like the Reference Myro HiFi Rack is designed to make these ongoing adjustments seamless, ensuring your system remains a sanctuary of pure sound.
The Vertical Hierarchy: Ordering Your Stack from Top to Bottom
Organizing your system requires a disciplined approach to vertical logic. The "Golden Rule" of high-fidelity arrangement is simple: sensitive, low-voltage sources belong at the pinnacle, while heavy, high-current power components anchor the base. This strategy for component placement on audio rack systems isn't just about physical stability. It's about creating a gradient of electromagnetic silence. By placing the most vulnerable signals furthest from the massive transformers of your power amplifiers, you preserve the micro-details and textures that define a truly immersive listening experience.
The Turntable: Priority One
The top shelf remains the traditional home for vinyl playback for two vital reasons: ergonomics and isolation. A turntable is essentially a mechanical sensor. It interprets microscopic grooves as sound, which means any external vibration becomes an unwanted part of the music. To achieve true sonic clarity, I often recommend using a turntable isolation platform to further decouple the deck from the rest of the stack. This additional layer of defense is especially critical in homes with older, "bouncy" wooden floors, where the mass of the rack acts as a ballast to keep the needle steady and the signal pure.
Middle Management: Sources and Preamps
The center of your rack is where the most delicate signal processing occurs. I view the preamplifier as the heart of the signal chain. It's a high-gain component, making it incredibly susceptible to picking up the electromagnetic hum of nearby power transformers. Digital sources like DACs and streamers require similar care. They generate high-frequency digital noise that can easily bleed into sensitive analog stages if they are packed too tightly. Maintaining a few inches of vertical clearance between these units is essential for a clean soundstage. This is where the modularity of the Reference Myro HiFi Rack becomes invaluable. Its adjustable tiers allow you to dial in the exact spacing needed to prevent digital haze from muddying your analog signals.
The bottom tier is reserved for power amplifiers and line conditioners. These are the heavy lifters of any setup. Placing them at the base significantly lowers the center of gravity, making your entire rack more inert and resistant to resonance. It also ensures that their significant heat and EMI signatures are kept as far as possible from your delicate source signals. When you respect this vertical hierarchy, you don't just organize gear; you curate an environment where every note can breathe. If you're ready to build this foundation, consider exploring the complete Myro collection to find the perfect architecture for your sanctuary.
Room Geometry: Between the Speakers or Off to the Side?
Where you position your foundation is just as critical as the order of the components themselves. While we've established the importance of vertical logic, the horizontal placement within your room introduces a new set of acoustic variables. I've often seen enthusiasts struggle with the choice between visual symmetry and acoustic purity. Component placement on audio rack systems is a three-dimensional puzzle where the boundaries of your room act as the final component in your signal chain. Finding the right balance requires a deep understanding of how physical objects interact with sound waves.
The Front Wall Configuration
Placing a Myro Classic directly between your loudspeakers creates a powerful visual "altar of sound." It's an aesthetically pleasing arrangement that keeps cable runs to your power amplifiers short and efficient. However, this configuration comes with significant acoustic trade-offs. A large, equipment-laden rack placed between speakers can disrupt the soundstage and imaging by creating early reflections. These reflections smear the phantom center image, making the music feel less holographic. If you choose this path, I recommend pulling the rack as far back toward the front wall as possible to minimize its interference with the speakers' primary output.
The Side Wall Alternative
Moving your rack to a side wall is often the preferred choice for those seeking the highest level of sonic integrity. By clearing the space between the speakers, you allow the soundstage to breathe and the imaging to lock into place with greater precision. This position also moves your sensitive electronics out of the high-pressure zone between the woofers, which significantly improves bass clarity and reduces mechanical feedback. There is also a practical, ergonomic benefit; having your turntable closer to your favorite listening chair makes the ritual of playing records feel more intimate and effortless. It turns the act of listening into a seamless extension of your lifestyle.
The primary challenge of a side-wall setup is the necessity for longer cable runs. This brings us to the classic XLR vs. RCA dilemma. For distances exceeding two or three meters, I always suggest using balanced XLR interconnects. They are designed to reject the noise and interference that can plague long, unbalanced RCA cables over a distance. While long cables can sometimes roll off high frequencies due to capacitance, investing in high-quality shielding ensures your signal remains pure from the rack to the speakers. Strategic component placement on audio rack units ensures that even with longer runs, the emotional payoff of a wider, deeper soundstage is well worth the investment in quality cabling.
Thermal Management and Cable Architecture
Heat is the silent predator of high-fidelity performance. While we often obsess over mechanical vibration, the thermal reality of our electronics is just as critical to the longevity of the system. Proper thermal management can extend the lifespan of your expensive AV equipment by up to 30%. In my experience, a cramped rack is a compromised rack. When mastering the art of component placement on audio rack tiers, you must account for the "chimney effect." This natural convection allows rising heat to escape through the vertical stack, preventing the slow, heat-induced degradation of sensitive capacitors and transistors within your amplifiers.
An open-architecture design is the most effective way to promote this natural airflow. Unlike enclosed cabinets that trap stagnant, hot air, an open rack allows your components to breathe from all sides. This isn't just a matter of safety; it's about maintaining the operating temperature where your gear performs at its sonic peak. When electronics run too hot, their electrical properties can shift, leading to a loss of detail and a softening of the bass response. By prioritizing airflow, you ensure that every listening session remains as crisp and dynamic as the first.
Breathing Room for Power Amps
High-bias Class A electronics are notorious for their significant heat output. Stacking components directly on top of each other is a recipe for premature failure and inconsistent sound. I recommend a minimum of three to four inches of vertical clearance for any power-hungry unit. Solid hardwood shelves, such as those featured in the Minimal Myro HiFi Rack, offer a distinct advantage over glass or metal. While glass can reflect heat back toward the chassis, natural wood provides a thermally stable environment that doesn't contribute to the "oven effect" found in tighter spaces.
Cable Dressing for the Audiophile
A clean signal path is often ruined by poor cable architecture behind the rack. The invisible electromagnetic fields surrounding your power cords can easily induce a 50Hz or 60Hz hum into your delicate interconnects. To prevent this, I always follow the "90-degree rule." If a power cable and a signal line must cross, they should do so at a perfect right angle. This minimizes the contact area where inductive interference can occur. I also use the sturdy columns of the rack to support the weight of heavy, high-end cables. This reduces mechanical strain on your RCA and XLR jacks, ensuring a secure connection that won't degrade over time.
A professional sanctuary is defined by the harmony between what you see and what you hear. You can achieve this level of technical and aesthetic organization by choosing the Reference Myro HiFi Rack, which is designed to manage complex cable looms and heavy components with effortless grace.
The Foundation: Why Solid Wood Completes Your Placement Strategy
You've curated the hierarchy, managed the heat, and aligned the cables. Yet, the final variable in your pursuit of sonic perfection is the material of the rack itself. Component placement on audio rack tiers is only as effective as the surface supporting your gear. I believe that a high-end system deserves more than mass-produced MDF or veneer furniture. These common materials often lack the internal complexity required to truly dissipate mechanical energy. Instead, they can store and reflect vibrations back into your components, raising the noise floor you've worked so hard to lower.
The science of vibration damping in solid hardwood reveals a distinct advantage over metal or glass. Metal structures, while strong, often possess a resonant "ring" that can introduce high-frequency harshness into your listening room. Solid wood, with its non-uniform cellular grain, acts as a natural energy sink. It absorbs microscopic movements and converts them into trace amounts of heat. This creates a neutral sonic platform where your electronics can perform without the interference of their own mechanical echoes. It's a harmony between high-end engineering and organic beauty.
The Reference Myro Standard
The "Reference" philosophy is defined by a commitment to zero compromise. In our workshops, we treat wood not just as a material, but as a precision instrument. A solid wood shelf acts as a natural low-pass filter for mechanical noise, effectively shielding your signal path from floor-borne interference. This artisanal approach also ensures the longevity of solid wood furniture. While your DACs or streamers may evolve over the years, a handcrafted hardwood foundation remains a timeless constant in your sanctuary. It's an investment in the art of listening that lasts a lifetime.
Choosing Your Aesthetic and Performance Level
Every listening room has its own character. For those with streamlined setups, the Myro Minimal provides a clean, punchy aesthetic without sacrificing the damping properties of organic timber. If your system involves high-mass power amplifiers and sensitive turntables, the Reference series offers the structural integrity required for absolute stability. Finalize your component placement on audio rack setups with precision leveling. Using machined brass spikes allows you to compensate for uneven floors. This ensures your turntable remains perfectly horizontal and your signal path stays pure. When you're ready to ground your passion in excellence, visit the HiFi Rack Shop to build your foundation.
Achieve Lasting Sonic Harmony
Refining your component placement on audio rack systems is the final, essential step in honoring your music. You've seen how a disciplined vertical hierarchy shields delicate signals from the heavy electromagnetic fields of power transformers. You now understand that the "chimney effect" isn't just a physical law; it's a way to extend the life of your prized electronics by up to 30%. Most importantly, you recognize that the foundation beneath your gear must be as deliberate and high-quality as the gear itself.
Our Myro series represents a multi-generational legacy of Serbian craftsmanship. We use only solid hardwood, never MDF or veneer, to ensure that every shelf acts as a silent, neutral platform for your sound. These are not merely pieces of furniture. They are artisanal instruments designed for maximum acoustic isolation and effortless thermal management. When you elevate your equipment, you elevate your connection to the performance. It's a commitment to sensory perfection that transforms a casual interest into a life-altering passion.
Explore the Myro Series: The Foundation of Your Soundstage
I invite you to slow down and appreciate the finer details of your setup. Your music deserves a foundation built with integrity and a deep reverence for the art of listening.
Frequently Asked Questions
Where should I place my power amplifier on a HiFi rack?
Place your power amplifier on the bottom shelf of your rack. This position offers the most stability by lowering the center of gravity and keeps heavy electromagnetic fields away from sensitive source signals. It also allows the rising heat from the amplifier to dissipate naturally through the chimney effect without cooking other components. Keeping the heaviest unit at the base ensures the entire structure remains inert during dynamic musical passages.
Is it better to put the turntable on the top shelf or a wall shelf?
The top shelf is the traditional home for a turntable because it offers easy access and isolates the stylus from other electronics. However, if you have flexible wooden floors that transmit footsteps, a dedicated wall shelf might be necessary. A high-mass solid wood rack often provides enough ballast to negate bouncy floor syndrome for most listeners, allowing the turntable to perform with absolute precision.
How much space should I leave between components for cooling?
You should aim for a minimum of three to four inches of vertical clearance above high-bias power amplifiers. This space is vital for natural convection, which can extend the lifespan of your electronics by as much as 30%. For source components that run cooler, one to two inches is generally sufficient to prevent electromagnetic crosstalk and ensure the internal capacitors don't suffer from heat soak over time.
Does the material of the rack affect the placement of my gear?
Rack material dictates how you manage mechanical resonance across the stack. Solid hardwood naturally dampens vibrations, whereas metal or glass can ring and reflect energy back into your gear. When planning your component placement on audio rack tiers, remember that wood acts as a natural low-pass filter. This makes it a much more forgiving platform for sensitive analog sources compared to resonant, mass-produced alternatives.
Should I place my HiFi rack between my speakers or to the side?
Moving your rack to a side wall is often the best choice for acoustic purity. While placing it between speakers creates a pleasing visual symmetry, it can disrupt the soundstage and imaging with early reflections. A side-wall position allows the phantom center image to lock in with greater precision while keeping your turntable within reach of your listening chair for a more intimate ritual.
How can I prevent cable interference in a crowded rack?
Prevent interference by following the 90-degree rule for crossing power and signal lines. Use the structural columns of your rack to route power cables down one side and signal interconnects down the other. This physical separation is the most effective way to eliminate the 50Hz or 60Hz hum that often plagues crowded systems. It also ensures that your signal path remains pure and free from inductive crosstalk.
Do I need a separate isolation platform if I have a high-quality solid wood rack?
A dedicated isolation platform is usually unnecessary if you are using a Reference Myro HiFi Rack. The solid hardwood construction already provides superior vibration damping compared to standard furniture. However, ultra-sensitive turntables may still find a slight benefit from additional decoupling in rooms with extreme floor-borne resonance. For most high-end setups, the rack itself provides the neutral platform required for sensory perfection.
What is the best way to level my components on a modular rack?
Use machined brass spikes or adjustable feet to achieve a perfect level on each tier. Precision leveling is non-negotiable for turntable performance and ensures that the mechanical load is distributed evenly across the rack's structure. Always check the level of the shelf itself before placing your component. This ensures the internal circuitry and mechanical parts aren't under unnecessary physical stress during operation.